Showing posts with label nail art. Show all posts

Saturday, July 7, 2012

Stripe You Later Nails Did

So I have this wedding shower to go to tomorrow so I had an excuse to redo my nails today!

I saw a colour sample on Pinterest (so addicted) and thought I'd go for it. I'm taking a different approach to posting and thinking of revamping the blog in a big style way so let me know if you like it!

I have some french tip guides on order from Ebay but I really wanted to do some simple striping and I just couldn't be patient. For this mani I used OPI San Tan.Tonio, Misa Dirty Sexy Money, and China Glaze Lemon Fizz.

So to start off I put on the OPI and then a coat of Sally Hansen Mega Shine (like Seche but CHEAPER!), then waited...and waited....and got impatient...then had to redo my thumb...and waited... till finally it was really really dry. Then I took my pre-cut strips of tape and stuck them a couple of times to my hand first so it wouldn't be too sticky, then applied them to the middle of my nails.
I put the China Glaze and Misa on at the same time so that while they were still wet and using the tweezers, I could pull off the tape really really fast. Et voila! Stripy nails!

I think next time I'll put the lightest colour as the base since I noticed that its hard to get it even (and really it would need a couple of coats to turn out best) when you have to rip the tape before the colour dries. Live and learn :)

*Niki

Thursday, June 28, 2012

Funny Girl Nails Did

It's funny how you never know how much you miss something until you finally get a chance to do it again! Man I've missed you polish blog! Life has been INSANE. And not  all the good insane unfortunately. But I have a very very low key wedding tomorrow so I needed to take the opportunity to finally polish my nails!

I looked to one of my favorite Momiji Dolls named Funny Girl to my inspiration.

As a base I layered China Glaze White on White with OPI Fit for a Queensland. Then used nail art pens to freehand on the circles.

I know its simple but I can't go too big for my first day back!

I hope everyone has been enjoying their summer so far and see you all soon!

Thursday, March 8, 2012

Kurosuke Soot Nails Did

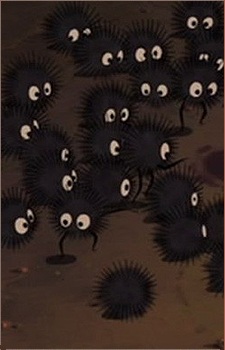
Who doesn't love the Kurosuke Soot Balls from Totoro and Spirited Away? THEY'RE SO CUTE!

I recently re-watched some of Miyazaki's films and was kinda of mad at myself for not ever doing homage to his characters in nail art form! So basically look for more of these designs to come LOL. One of my favorite characters from Studio Ghibli are the Soot - I even have a plush one that rattles when you pull a string!

So for the base I used China Glaze Recycle, then for the black balls - Orly Matte Vinyl. To get the "fuzzy" edges I used a fan brush and dipped it in polish to sweep on the polish. For the white eyes I used a nail art pen.

Friday, February 24, 2012

Madame Butterfly Wedding Nails Did

So I have a wedding to go to tomorrow - the first of 8 this year! WHOOO?! My dress is this kind of olive colour that I bought from Dress Barn (most unsexy store name EVER). But it looks really good on me! So I wanted to do something green and reflective and I thought of butterflies! 
So to begin with, using a sponge, I did a gradient of Nubar Wildlife, Gosh Golden Dragon, China Glaze 2030, and China Glaze OMG. Then using a black nail art pen I filled in the black, dotted with a white, gold and light green nail art pens and topped it with Sally Hansen Disco Ball (really sparkly rainbow glitter).
Top: with flash to capture some of the holo. Bottom: trying to capture the sparkle 

My pictures sadly don't do it justice and IRL it looks crazy holo + sparkly. I think it would also look ten times better if only my nails were longer but every time I try to grow them even a little bit they automatically break :( I think I have to start investing in some sort of strengthening serum.

Tuesday, February 21, 2012

Film Buff Nails Did


I broke my thumbnail this morning and in a calculated effort to not rip off the rest of my nails so that they're even, I decided to polish them! Besides its been a while right?

For the base I used China Glaze For Audrey (haven't worn this in literally a year) then used a combo of white and black nail art pens, CG White on White and Liquid Leather for the film reel.

Gettin' ready for the Oscar's on Sunday. I'd be excited if it was anyone but Billy Crystal hosting - seriously...he's still alive?


Friday, February 17, 2012

Fly like Paper Planes Nails Did


Oh man, I did these a bit ago I've just had NO time to post them till now. I found some inspiration on the web for these admittedly - since my idea machine is working on fumes lately because Kai REFUSES TO SLEEP!!! I also regretfully cant remember where I got the inspiration from to link them properly - so if you know it, let me know and I will!!!

I used China Glaze Solar Power as the base, White on White and Recycle for the plane and black nail art pens for the plane path.

I think its super cute!

Thursday, February 2, 2012

Gold Wave Nails Did

I challenged myself to do a 15 minute manicure while I was still the only one in the office early this morning. I originally want do some sort of ornate dotting and swirling pattern then I realized it was 8am and I just wasn't going to get that to happen lol.

So I ended up thinking of the people on my 2nd floor at work, the good old people in radio! So in tribute to them who were all probably working as early as I was I did a take on the radio wavelength.

I used China Glaze 2030 as a base and then simply lined in some waves with a nail art pen in black! Simple, quick, modern, and I like it.

Chevron Nails Did

Well I set out to do a military kind of theme and then somewhere in the design things started to go wrong. And then I kinda just went with it. It actually looked much better than it managed to photograph...

Maybe I have to get some khaki polishes for actual military inspiration! lol.

I used Nubar Forest with a layer of Nubar Wildlife as the base, then used painters tape to block out some triangles and then used China Glaze 2030 to fill it in. Lastly to cover the edges I used a black nail art pen swiper.

Meh...its okay.

Thursday, January 19, 2012

Dress Em Up Pink Nails Did

I wanted to go with something simple and fun - and I wanted to use that Eyeko Punk Polish again. There is just something about neon pink that I love to hate but you have to admit it looks good on pretty much everyone!


So I used Eyeko Punk Polish for Neon Nails as a base then with a black striper pen drew out little ties and buttons. Now my nails are dressed up for a night on the town. Unfortunately I'll be going to bed since Kai thought it was cool to start pulling my hair at 5:30am. It wasn't.

Sunday, January 15, 2012

BAM POW Nails Did

So, one year has come to a close and I officially start back to work tomorrow after a wonderful time on maternity leave with Kai. Where has the year gone!?

So to get me over this hump I thought I could use some bright colours to pump me up. Pair that with my love of comics and you get comic bubbles!

Thumb: Joe Fresh Cobalt, Joe Fresh Pineapple, nail art pens
Pointer: JF Pineapple, nail art pens
Middle: OPI The Thrill in Brazil, nail art pens
Ring: Nubar Green Tea, nail art pens
Pinky: Eyeko Punk Polish, nail art pens

BAM POW wish me a good day back in the office!

Wednesday, January 11, 2012

Remembering Bali Nails Did

 It will be 5 years in May since Ben and I had our honeymoon in Bali and I miss it so much! I'd love to go back one day soon. When we were there seeing a performance of Balanese dancers at the end we had the opportunity to buy a plate with our image on it that they made in all of 2 minutes for about $2 so we couldn't pass it up. Its actually quite a nice keepsake.

So I thought that I would use it as some inspiration for my next manicure!

For the base I used Orly Royal Navy which by the way I always have a longing for to wear as is its just that nice! Then painted on some white flowers with a nail art pen, topping that off with some nail art pen in gold sparkle. Then I used OPI Thrill in Brazil with a small art brush for the red and a touch of China Glaze Light as Air from the Up and Away collection.


Wednesday, January 4, 2012

Pretty Etchings Nails Did


Oh fellow nail blogger's, I've missed you! My baby boy turned 1 on New Year's Eve and for a bit he's been on a better schedule so I'm taking the opportunities while I can to do some nail designs again! Also, I *may* add a section to the blog in the upcoming year regarding bento making since I'll be making all of his lunches for daycare. But I digress.

I've always loved this vase that's in my living room (I think its from the Debbie Travis collection) and so I used it as inspiration for my nail design!

So I started off with two coats of OPI Fit For a Queensland then used a red striper pen to put some stripes across choice parts of my nail.

Then I outlined a flower and vine design using a black nail art pen. Once I liked hat I painted in the gaps using China Glaze Liquid Leather and a small art brush!

Hope everyone had a happy holidays and see you real soon!


Friday, July 15, 2011

Wild About Weddings Nails Did

Tomorrow one of my best friend's Stephanie is getting married...again...but this time to a keeper! So of course to match my fabulous dress that my sweet hubby bought me I thought I'd do my nails (since I haven't done them in so long because Kai sprouted teeth and likes to chew/rip off my polish :S).

This is what my dress looks like! It's a green and black halter made from silk and chiffon. It's really rather nice and holds my GIGANTIC boobs quite well. I wasn't quite sold on it at first but the more I see it the more I really like it.

So I decided to go with something a bit more exotic since the dress for some reason reminds me of the jungle.

I've been wanting to do a zebra print forever but for some reason despite its simplicity just never got around to it. So here it is with a twist:

I used Nubar Green Tea for the base and striped on China Glaze 2030 for the gold accents and then used a black nail striper on top for the stripes. And of COURSE they bled. I have to get a new Sally Hansen Mega Shine top coat since this one is thickening and making my polish bleed :( But its not that noticeable in person.

Excuse the horrible cuticles. They're recovering from lack of calcium and being butchered at the nail salon - AGAIN. What is with these people and killing my cuticles??? Poor poor fingers. Also no matter what I do I can't keep my skin hydrated. Any one have any favorite hand creams to recommend?

Tuesday, June 14, 2011

Glee Nails Did

So for my birthday my friend Jenn treated me to the Glee Live concert that came to Toronto. I'm a BIG Glee fan so lets just say I was a bit more than excited. Its also a good time to go out with the girls and get away from the kid! We also had great seats which made spending all that money totally worth it :D

So of course for the occasion I did my nails. I'm showing you my right hand because just as I was leaving - Kai is teething so I was putting some gel on his gums and he decided to chomp down on my left hand and smudge 2 of my nails :( So you'll get to see my ambidexterity at work I guess! I wrote the Glee logo on each nail and then did the loser symbol on my thumb, but please forgive it I did do it with my left hand!!!

I used Joe Fresh Pineapple with Sally Hansen Disco Ball on top. I then used a red nail art pen to do the logo and lettering.

Here are also some pics from the show! SUCH A GOOD TIME!


Thursday, March 17, 2011

Smell My Flowers Nails Did


So since I was too late on the St. Patty's train this year, and since my last mani chipped already :( (However on the upside I found some water decals that look JUST like the flowers I did so I may use those in another mani to kind of recreate the look with less effort :D ) I did another spring inspired mani!!

I used nail art pens in yellow, light green and dark green for the grass and a white and orange pen for the flowers. Then I used a water decal from Viva La Nails for the butterfly! I think they're perfectly spring-y!.

Tuesday, March 15, 2011

Spring has Sprung Nails Did

Did you miss me? Cause I missed all of you!! Its been hard to find time to polish nails since Kai arrived, but we pretty much have nap times down so between about 2 of them I can try to get something done :).

Its finally starting to feel like spring and its absolutely beautiful out so I couldn't help but do something a bit light and fun! For the green background I used China Glaze Re-Fresh Mint and the pink is Color Club Pardon my French. Then I used nail art pens in white, pink and dark green for the designs. The darker pink I used for shading in the flowers is Finger Paints Up & Coming Artist. Hope everyone is getting a taste of good weather!!!

Friday, January 14, 2011

Tim Burton Nails Did

Wooh. So I took a bit of a break there but more on that later. For one of my Christmas presents Ben got me tickets to the new Tim Burton exhibit that is at the Bell Lightbox here in Toronto. It's actually here until April but with the baby on the way we thought it would be best to try to go see it before having to haul around a newborn. I was only able to get a picture of the front of the exhibit since cameras were prohibited on the inside but let me tell you it was awesome! The same exhibit is in NYC right now so if you can't make it to Toronto you have another option. It's the perfect exhibit for the Burton lover - there is so much going on in that guy's mind its incredible! Did you know he used to work for Disney as a concept artist and nearly all of his concept art was rejected? But then if you've seen the Adventures of Stainboy you can pretty much figure out why.


So I decided to do some Tim Burton themed nails to go along with my experience! I used a combination of all of the following: Orly Matte Vinyl, China Glaze White on White, OPI Thrill in Brazil and nail art pens in white, black and red.

Saturday, December 25, 2010

Holiday Bling Nails Did

with flash
Whooh what a crazy week! I've been off on maternity leave now since last Thursday and I know I'm supposed to use this time to rest up before the baby comes but really I've been on the go EVERY DAY! But I did find some time last night to do my nails. I wanted to do something not so typically "Christmas" so I did a sort of winter wonderland feel. Please forgive my lack of watermark (please don't steal my pics, they're crappy anyway LOL) since I'm working on my new macbook and don't have Photoshop set up yet :(

without flash
I used Orly Rage with some snowflake rhinestones and little blue and silver beads that I picked up for really cheap on Ebay! Slapped it all on with nail glue (hate that stuff) and Sally Hansen's  Top Coat. Does anyone know of a topcoat or technique that won't dull your rhinestones??


Hope you all have a very Merry Christmas and a Happy and safe Holiday!! All the best leading up to the new year and beyond! And please send me some blessings to get this baby out - its due on Thursday!!!

Tuesday, December 14, 2010

Karmin G3 Review and Boozemas Party Nails Did

 I mentioned before that I would be receiving a Karmin G3 Flat Iron from the lovely people at Karmin to give a test run! Now I don't straighten my hair too often because it usually takes me about 2-3 hours (I'm not even joking), and that doesn't necessarily include all the prep before-hand like washing and blow drying it! So What I look for in a flat iron is something that is ceramic (I had one with metal plates on it once...never again!), light weight since I hold it for so long, and something that will hit a very high heat. The G3 is perfect for all of these, plus it has the added value over my current flat iron where it can actually straighten then put big curls in by wrapping your hair around the barrel. My current iron is so square and flat that doing that would be impossible and look pretty stupid - so I guess that's why it's one of the top hair straighteners!

So here are some before and after pics - I decided to straighten my hair for my annual Boozemas party. So keep in mind that I had been cleaning all day and didn't get a chance to actually blow dry my hair before I flat ironed it, so it looks WAY drier then it normally would. But you totally see the effect:

Before:


After:


 It works awesomely! I can't wait to try it with my full regime of wash, blowdry and straighten. And added bonus - this only took me 1hr 45min - trust me for hair as curly and thick as mine that is AMAZING. I would highly recommend this flat iron - makes a good stocking stuffer ;) And if you DO want one for your very own take advantage of 10% off with this code: GIVEAWAY10

I also did my nails for the party! Little presents! I used China Glaze Ruby Pumps for the base and brushed on crosses of 2030 with a bit of glitter from a nail art pen on top. Then I made very quick bows with China Glaze Emerald Sparkle. I think they're festive and cute!


Related Posts with Thumbnails